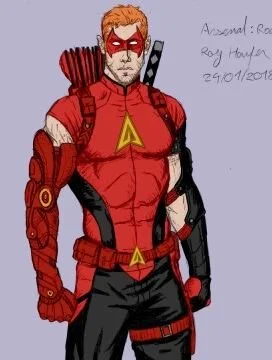
Arsenal Original Concept

This post will cover creating an original concept version of DC's Arsenal. The client wanted to base the style of the costume off the Injustice 2 Legendary Green Arrow and pull in elements of a couple of different Arsenal versions.
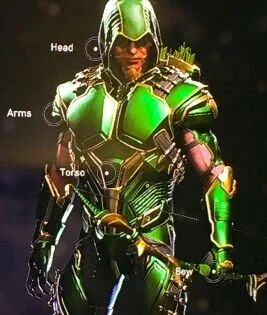
The armored Green Arrow was the main inspiration for the design, but it was meant to be translated to Arsenal. I began by creating a base vest that would serve as a foundation for all of the 'armor' sections that would be built up - similar to the Punisher vest.
I began by mapping out the base vest patterns and the details that would be added.

I will skip over some of the fine details, but this piece was built using many of the same techniques used to construct the Punisher vest and Noel Batsuit so you can refer to those posts for additional information.
I began by assembling the front base. The base was made of a thin black faux leather backed with muslin. The sides feature red cordura, so that was added in at the beginning. I then began building up the details on top.
The 'abs' were created by layering 2mm foam pieces and covering them with Cordura using Super77 spray adhesive. The Gold accents were created the same way with metallic spandex over foam. The accents were sewn down to the base first, and then the 'abs' attached.

Next, I made the straps that extended from the chest and over the shoulders into the back section. These were made by covering 3" wide strips of headliner foam with red Cordura. I then covered 1.5" strips of 2mm craft foam with black faux leather. The red strips were edged in gold. Then the black ones were bound and sewn down to the finished red stripes to create layered straps.

I then added the shoulder base pieces. These were also made of the black faux leather backed with muslin.

For many costumes like this, the separate components must be assembled to a certain point, and then they all get added to one another in a puzzle. So far, I have the base with the shoulders and the straps. The next pieces I needed to assemble were the chest and collar, and then all those parts could be layered together.
The chest was built using the same method as the abs - 2mm craft foam pieces were layered together and covered with red Cordura. The two chest pieces were then sewn together in the center.

Before I could finish padding the chest, I had to create the symbol. Again, this was made of layered craft foam and covered with gold spandex. To create a dimensional look in the fabric so that the layers of foam are crisp, I used a zipper foot and stitched the fabric around the layers.


The gold edges were turned under, and the symbol sewn down. To get the sharp, clean edges and keep the piece from sliding around while sewing it to the chest, I sprayed the back with Super77. I could then wrap the god edges around the bottom layer of foam, and they would stick. The piece would also lightly tack to the chest while sewing it down. Once the symbol was added, the entire chest was backed with a layer of headliner foam to give it some extra bulk.
Next, the collar needed to be created. The collar has its own base made of red Cordura backed with muslin. The collar stand was added, and the 'faux front' edging was stitched down (the collar closes with Velcro in the back).
The outer edges of the collar and chest were edged with black, and all the pieces were sewn down to the base. First, the bottom edge of the chest was sewn to join with the abs and gold accents. Then, the collar was added, and finally, the straps were placed and sewn down, and the top edge of the chest was sewn down over the straps and front of the collar base. At the same time, the 'rib' pieces were made (same technique of 2mm craft foam and Cordura with edging and sewn down.


The next step was to develop the lower back of the vest. I used the base vest pattern and drew out the details I wanted. I then built the back using the same technique as the front - base in faux leather backed in cotton, and the details built up using foam, red, and gold. Once assembled, the back piece was added to the upper shoulders.


The vest closes with zippers on each side and velcro on the back of the collar. Once the back was complete, I moved on to the shoulders. The shoulders consist of four main pieces:
wing - attached to the vest
upper 'pauldron'
lower 'pauldron'
bicep cuff
For the wings, I cut a basic shape out of poster board and tested it on the vest until I had the shape I wanted and the edges lined up properly with the vest.

For the pauldrons, I started with an old arm template I'd started on and used that as a base. I then reworked the pieces until I got the desired shape and design.
The pauldron attaches to the vest under the wing with elastic and side-lock buckles. The bicep cuff was made by backing the black faux leather with headliner foam and accenting it with gold. It was then sewn to the bottom of the pauldron.
A variation of this pauldron pattern is also available as part of a set in my Etsy shop.


Here's a short video of the vest assembled.
The last piece to create for this project was the bionic arm. The client only wanted the arm to come to the elbow and to maintain a lot of flexibility and use of his hand. So, I created segmented armor that would fit on a glove.
The first step was understanding the shapes and curves of the forearm and elbow. I wrapped my arm form in plastic wrap and tape and sketched out the shapes I wanted - leaving space between them for the glove to flex and move with him.
These pieces were cut out, flattened and transferred to foam. The foam pieces were heat-shaped, and the details were built on top of the base shapes.
The plates for the hands were then cut out, heat-shaped and detailed. If these pieces look familiar, they are the templates I used for my Dr Doom hands.
All of the armor plates were then coated with Plasti-Dip and painted. Once the paint was complete, they were glued to a full-length glove.


The glove was trimmed to the right length, and a red band was added to the top. Here's a short video of the completed arm:
And, the finished costume with accessories added.
