Captain America Original Concept

I've taken on a new, original concept Captain America project. I'm using the below artwork as reference, though this unique piece is not meant to be any one version but an original "mash-up" of some of the elements I like from the various sources. The kneeling reference is from the "Living Legend" TPB, the armored rendering is by Guy Bourraine Jr, and I do not have a source on the Legends concept line art. Please let me know if anyone knows where this originates, and I'll add credit here.


For the foundation of this design, I’m turning to a previous Cap project that was very modular, as he wanted to swap out pieces to make several different versions of the character with one outfit.


I began on a new version of the upper jacket. This one will have silver biceps and blue forearms. This sleeve is not finished and is only pinned to the jacket, but you can get the idea.

The next thing to work on was the torso. I like the style of the Bourraine torso and the way it goes with the armor. However, I wanted the stripes to be more prominent, so I began with a muslin blank of the torso, drew on the lines I wanted, and marked them by color.
The muslin blank was then cut apart to create the pattern for the new torso, and I began cutting the pieces. To keep with the armored style, I used red faux leather, silver from the sleeves, and some blue metallic vinyl that I had left over from a Nova Prime project a few years ago.
I began at the front and worked my way from top to bottom, assembling the stripes. Once the front was complete, I finished the back.


After the torso was built, it was lined with muslin, the spandex top (that fits under the jacket), and the bottom edging and the zipper were installed.


The pants were constructed based on military BDU pants with some stretch areas added. Here are images of a test fitting of the torso with the jacket to look at how it's all coming together.


I decided to go in a different direction with the 'armor' pieces by basing them on some of my other recent projects like Daredevil, Punisher and Batman.
I began the chest by making a base pattern and building the foundation in the navy Cordura backed with headliner foam. The bottom edge, center top and armholes were finished with binding.
I then made another copy of the base in muslin and sketched out the new details. This was then cut apart and used to build up the armor segments on the chest. Similarly to the Punisher vest, the pieces were cut from 2mm craft foam, covered with Cordura and stitched down.
Some details incorporate the torso's metallic blue and red faux leather to pull the whole thing together.
The next piece to add was the collar on the new chest. I liked the AoU collar with the split in the front and the red chevrons on the side, so I went with that style.
Once that was attached, I made a backplate with EVA foam and Cordura. This will be sewn down on one side, velcro on the other, and cover the back zipper.


With the chest finished except for some detailing, I got the shoulders underway. I used the pattern for the tactical Batman for the basic shoulder bells. These were also lined with headliner foam to give them structure.
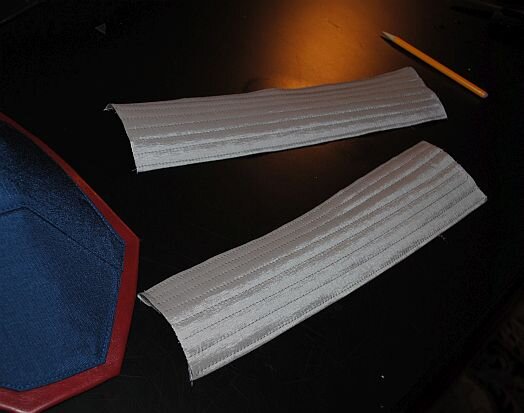
I then created an edging piece by covering craft foam with red faux leather and sewing the main shoulder bell to it. Straps were made to hold the shoulders to the biceps using the same silver fabric on the sleeves and headliner foam. The material was backed with foam. Then ribbing was stitched down for added detail.
The shoulders will attach to the inner jacket and extend from under the chest piece. Once I get a final fitting, the straps will be permanently attached. A moulded insignia detail will also be on the shoulders (I'll cover that later).


At this point, I was at a stop on the upper body until I got a few more supplies in and the shoulder mould, so I moved on to the gauntlets.
I like the style of gauntlets from the Avengers costume and decided I wanted to play around with this version.
I began by making a paper template and sketching out the details. Then, I made the base structure out of headliner and EVA foam. The EVA foam in the center section is 6mm, while the sides are 2mm. It's not easy to see in the image, but the 6mm pieces are beveled, making molding the fabric and sewing the detail lines easier. I like the later versions of the MCU costumes for pulling the brown elements into the accessories. While I wanted to do that, I also wanted the brown to be more of an accent and not a base for the pieces. So, this gauntlet base was covered with Cordura sprayed with Super 77. I then used my original template to trace the edging and detail lines in the brown faux leather. This was sewn down using a Teflon zipper foot, and the edges were trimmed, wrapped to the back and glued down.
The inner forearm piece was made using a piece of brown faux leather detailed with red Cordura. It is held in place with two strips of elastic. Red Cordura straps and silver buckles were added to the outer gauntlet, which straps on top of the lower piece. The gloves arrived, and here's a quick look at them together with the gauntlets at this point. These will be color corrected and have hand guards that cover them (similar to the latest MCU suits).


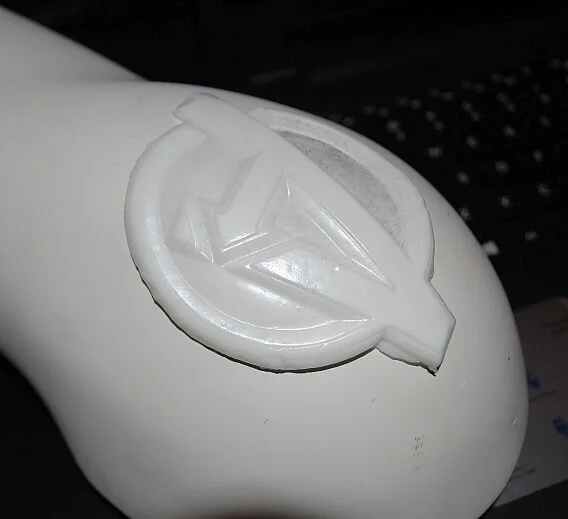
Having had some other supplies delivered along with the gloves, I took a break from the gauntlets to test the shoulder emblem and get the helmet going. The emblem for the shoulders was the Avengers "A" emblem at a larger scale than the ones I've made for the AoU suits. As it happens, one of my regular suppliers included an Avengers ornament in a shipment, which was the perfect size for this project. He was nice enough to permit me to do a one-time recast of his piece for this project. Here is a picture of the two molds side by side for scale. I'm using Amazing Casting Resin for these. It's a craft-quality resin, but I like it for small widgets like this for two main reasons:
It's very lightweight and doesn't weigh down garment pieces or flop around
I can pull it before it's completely cured and get complex curves out of the pieces
The latter is what I've done for these. I poured the resin, let it cure about 90%, and then carefully de-molded it and taped it down to the shoulder of a mannequin arm to harden. When it was fully cured, it retained the curve of the shoulder. It just needs to be cleaned up, sanded and painted. Here's what the raw piece looks like against the shoulder.


The helmet was out of 6mm EVA foam. I opted to create my own pattern from scratch rather than try to adapt an existing template. I turned to my trusty Ed Head to help me out. I covered him in plastic wrap and then masking tape.
Here's a tip when working with something that needs to get into small details - like the brows and bridge of the nose: it's easy to get into those areas if you lightly spray your head form with spray adhesive and then press the plastic down onto it. This way, the plastic adheres to the form and keeps its shape while applying the tape.
Once he was covered, I drew on the basic shapes for the helmet.


I then cut the tape apart and transferred the pieces to poster board. These were then cut from foam and assembled. I pre-formed the sides and top pieces with a heat gun and then, working from the sides to the middle, glued the pieces together with contact cement. Once the base of the helmet was assembled, I used the heat gun to add subtle shaping to the brows and temples and added the nose piece.

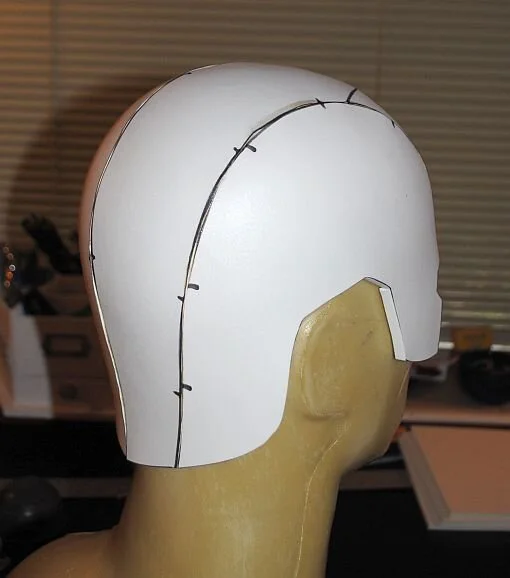


Then came the detailing. I used the templates that I made for the base helmet and traced out some accent pieces on poster board.


I began detailing the sides. First, I added thin strips of 2mm foam to cover the seams on the sides of the head above the eyes. The rest of the pieces were cut from 2mm foam and, working back to front, were carefully applied to the base with contact cement.
The top detail section was created and applied the same way, and then the wings and signature "A" were added as an additional layer.
2mm foam is pretty easy mold around curves if you work section by section and take it slow. I cut the top piece flat and then drew a line down the center on the underside (which is slightly visible in the image on the left). I then applied the contact cement to only the front above the vents. I lined up the center line on the detail piece to the center seam on the helmet and laid it down only in the center. I was then able to press and mold the foam around the top of the helmet curve. After I had it started in the front, I applied the cement to the rest of the pieces and slowly laid it down, matching the center lines and then carefully smoothing and molding the foam over the top.


The ears were the last of the main pieces to add to the helmet. I cut these from 6mm foam, traced out the detail lines I wanted and then sliced them in with an X-acto knife and used the heat gun to open the cuts and slightly curve the pieces to fit the contour of the helmet.
At this point, it was time to give the whole thing one last heat-seal with the gun and give it a couple of coats of Plasti-Dip.


I used some flexible caulking to refine some of the edges a bit and hide some seams. Once that was set, I gave it a couple more coats of Plasti-Dip, masked off the inside and put a base coat of navy blue on the whole thing. The base coat was then covered with metallic blue, and the helmet was masked for the silver accents to be painted. The following steps on the helmet are detail painting (including ageing/weathering) and the chin straps.


Next, I got started on the boots. I found a pair of boots online that I liked for style and decided that they would be the inspiration for this project. I sketched out some basic paper templates based on these boots.


I transferred the front to a tracing paper template to cut the pieces. I cut the foundation piece out of 2mm EVA foam and worked from the center out.
I created a pad for the center section with headliner foam, layered a piece of red faux leather, and added detail stitching. Next, I covered the upper/side area with brown. Then, another layer of 2mm foam covered with red Cordura created the top layer.
I used some scraps of Swedish tracing paper to sketch a rough template for the upper. I made the upper by covering 2mm foam with red faux leather.


I then turned to the back. These will work similarly to the inner parts of the gauntlets - they will form the calf and have elastic in the front. The shin guard will then strap over them to make a complete boot shaft.
The backs are made of brown faux leather lined in black for stiffness and accented with a red Cordura stripe over the center back seam.
The last major component of the boots to attend to was the knees. I created a template for the knees and constructed them using the same methods as the rest of the boots. The main knee pads were made of foam covered with red Cordura. I then added a shaped brown section (backed with foam) to the bottom of the knees. The knees were then stitched to the shin guards, straps, and buckles (just as they were on the gauntlets).


Here are the boots at this point.


Next, I got the harness together. I used my templates for the AoU straps, created the base straps using 2mm EVA foam, and covered them with faux leather. I added a red Cordura (backed with 2mm foam) detail to the upper strap. The straps connect under the arms with the same silver side-release buckles used on the gauntlets and boots.
I decided to use a back piece I had already been playing around with as the base for the 'backpack' to which the straps would attach. This piece was simply a piece of 2mm foam covered with Cordura. The straps were fitted and then sewn down.
The next step was creating the detail piece to go over this base. To do this, I traced out the shape and created a template on tracing paper with all the details I wanted. A piece of 2mm foam was used as the foundation. The first piece to go on was the star.
Cutting the center circle from the metallic blue vinyl, I tacked a 2mm cut out of the star to the center and then mounted them to the foundation. The star detail was stitched in using a Teflon zipper foot. I then tacked down all the other details and made the cover out of Cordura with the circle surrounding the star. The inside edge of the circle was finished, and the cover was mounted to the foundation. The detail lines were then sewn down with a zipper foot, and the edges were turned under and sewn down.
I then added some grommet details, glued the piece to the back of the harness, and added some blue details and hardware to the upper straps.


Here's the completed harness on the costume.


The belt and pouches were built to match the harness and other accessories. I also got a surprise from Jordan’s Ironic Armory, who sent me one of his new helmets, so I had to use that when we took this guy out.
Here are finished images of the completed costume.


