Witcher Skellige Undvik Armor

In this thread, I’ll be talking about how I went about creating a replica of Geralt’s Skellige Undvik armor set that appears as an unlockable skin in the Witcher III video game to be worn at DragonCon 2022 in Atlanta.
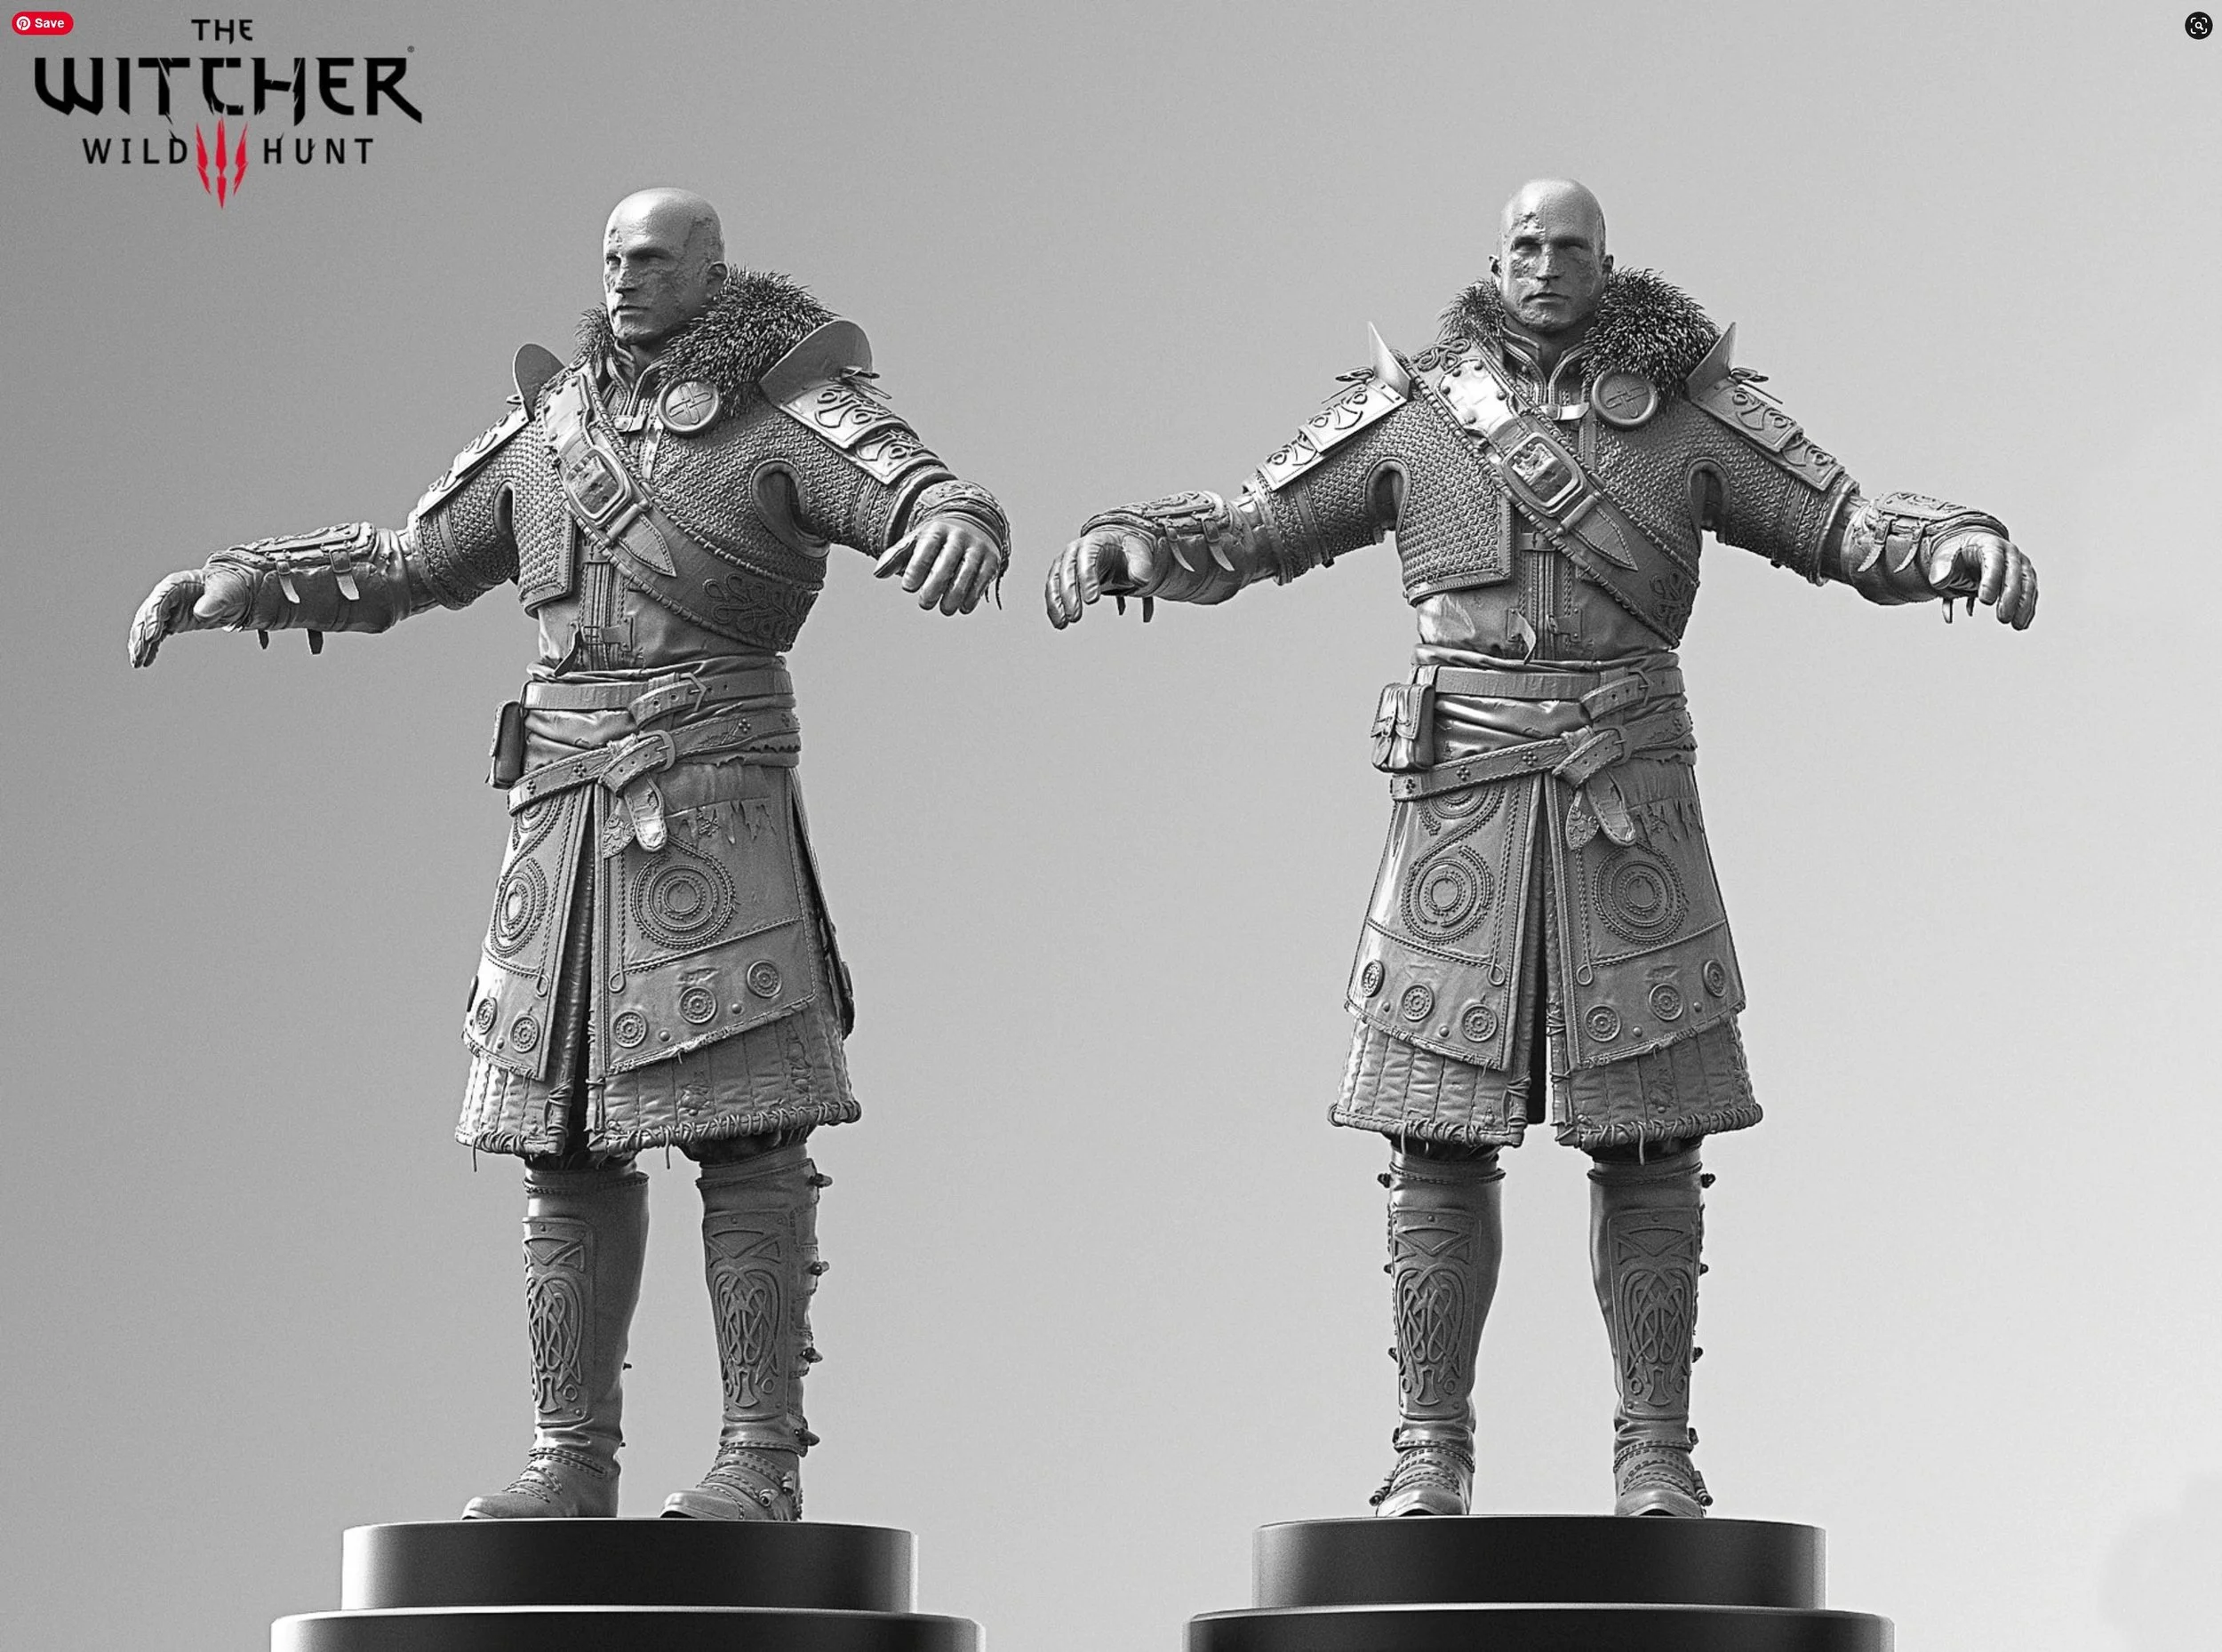
I started by gathering reference images to get a clear look at all the details and get a plan together for how to attack this project. Among the many, many images I saved, these were two of the most useful.

I decided to approach this costume layer-by-layer and work from the inside out. This way, I was sure each piece was sized and proportioned to fit over the one beneath it.
While you don’t really see much of the very inner layers of the costume, I decided that I wanted to include a shirt for a few reasons:
I wanted to be able to have the gambeson sleeves tied on so that the underarms would be open for movement and ventilation.
I wanted the gambeson sleeves to be elbow length to reduce bulk and heat under the gauntlets.
I wanted there to be an inner shirt to catch sweat and prevent too much soaking through all the other layers.
To achieve these goals and keep everything somewhat seamless, I made the shirt in black linen. I didn’t want to make the wolf emblem necklace, so I purchased one from EverKeyArchive on Etsy, and it was beautiful.


Next, I began building the black gambeson. I modified my LARP Rogue gambeson pattern (available in my Etsy shop) to create the base for the body and sleeves. The gambeson is made of lightweight black faux leather. The body is lined with washed muslin for structure, and the collar, sleeves and skirt are all backed with headliner foam - a pretty standard technique for my builds.
The sleeves, skirt, and collar were topstitched to create the padded segments. Once the pieces were assembled, the armholes and ends of the sleeves were bound in black faux leather.


Next, the outer edges of the gambeson, from the waist at the center back split in the skirt, all the way around was edged to 1/2” with a rust-colored faux suede. The edging was then trimmed with a dark gold 2mm soutache braid.
Finally, the grommets and lacings were added to the front and sleeves.


The next layer was the tunic. I started the tunic by further modifying the same gambeson pattern to fit properly, edited a few of the seam lines, and determined the wide edging. I then had a useable pattern to get started.

The tunic and pants were made out of a dark green burlap that was dyed with black and brown washes to give it some depth and mottled color. The burlap was backed with washed muslin to not only keep it from warping and give it structure but also to give it some highlight and prevent it from looking too flat.
Next, the edging at the bottom of the skirt tabs and the center front was made of medium-weight black faux leather backed with black cotton and attached. It was then time to map out and create the scroll design on the front and back.
The scroll design was created by stitching down a 1/4” ivory braid and then “outlining” it with a 2mm ivory soutache braid. Once complete, the outer edges of the tunic were given the same trim treatment as the gambeson, except instead of faux suede, the tunic was edged with burgundy faux leather.


To complete the tunic, the buckles and straps were added to the front and detailed with bronze studs, and the armholes were bound in green twill.


One of the most complicated and time-consuming pieces of this costume came next - the short hauberk with the underarms cut out.
For this piece, I began with a basic chainmail shirt. I chose aluminum rather than steel for easier working but mostly for weight. I then mocked up a bespoke pattern for the vest on top of the other assembled pieces.


I knew there was no way I could just start cutting away at that chainmail, so I decided the hauberk needed a base to be sewn onto. I created the base in black burlap and added the faux leather edging and all the soutache trim.


I laid the chainmail over the base and - moving the vest from the form to a flat table as needed - went link by link, smoothing the chainmail to the vest, taking out the excess with needle-nose pliers, and stitching it down along the edge using twine and a thick-bladed needle. I did the outer edge of one side first, then the underarm and “cuff”. I then did the other side in the same order.
The soutache was applied to all the edges where the chainmail would be sewn and provided extra support to the burlap to ensure it didn’t tear or warp under the weight.


At this point, all of the main clothing pieces were complete, and it was time to start on all the accessories. The pieces I knew were critical and would need collaboration were the armor and hardware, so I started there first.
After deliberation, it was clear that foam was not an option due to the complexity of the knot designs. These pieces HAD to be printed or cast. I immediately counted out just having the pieces printed for a few reasons:
The cost and time to have all ten pieces printed individually were prohibitive.
Getting the curves right on 3d models would be very difficult, and if they were wrong, all was wasted.
Going with all printed pieces would be heavy, brittle, or both - and if one got broken, there was no easy way to replace it.
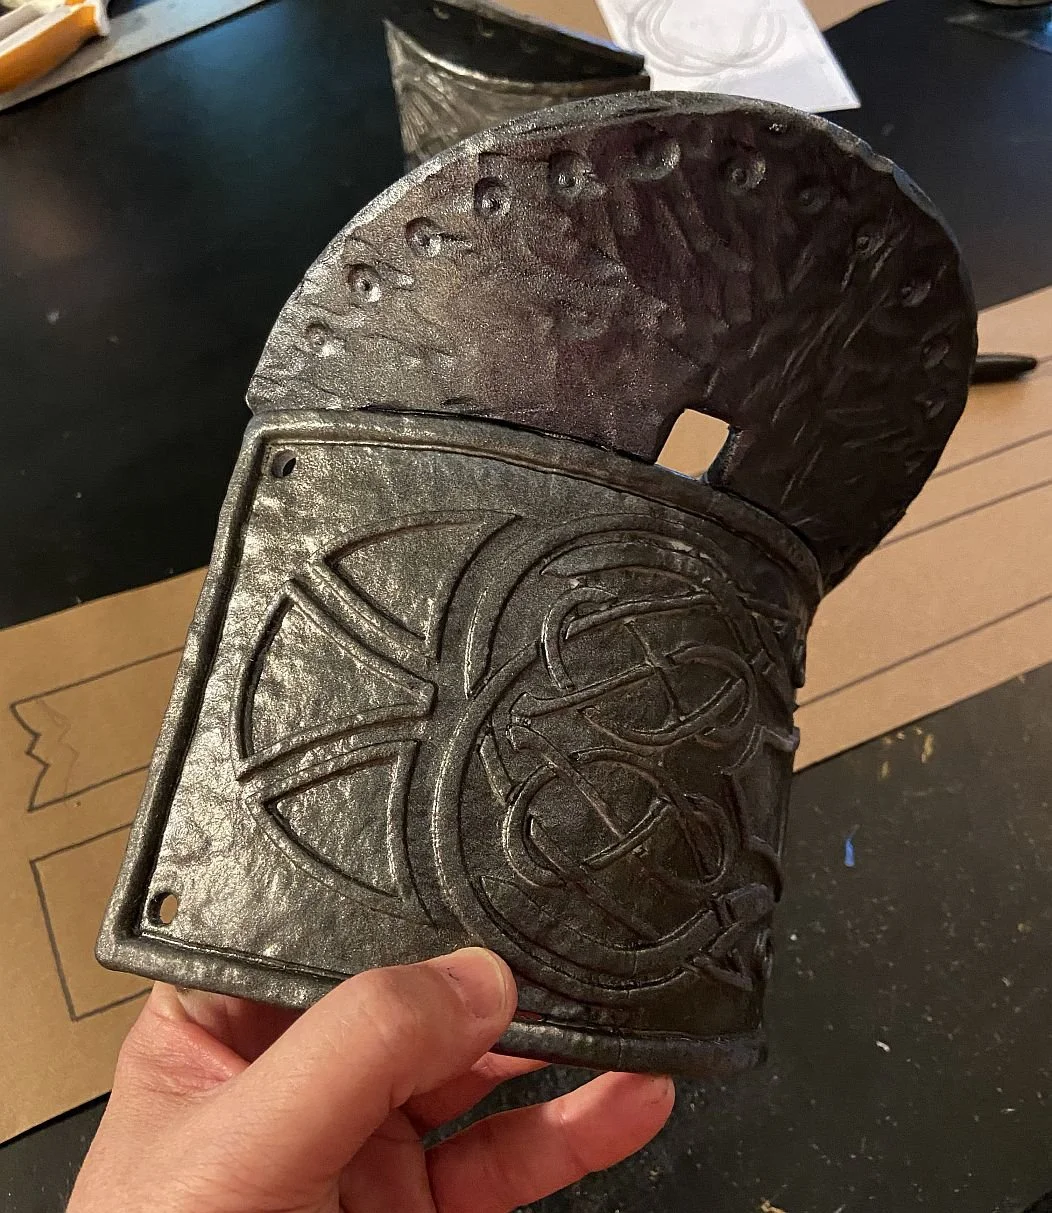
I opted to go with flat printed plates, make a mold of them, and then cast them in lightweight resin. I started by working with my reference images and creating vector files of the armor plates at the right scale to fit the costume. These files and images of the medallions from the reference materials were used it create 3d models, and they were all printed flat in resin.


After some cleanup on the resin prints, I pulled a mold and set about casting all the pieces. The mold was made from OOMOO 25, and the pieces were cast with Amazing Casting Resin. I like using Amazing Casting Resin for a few reasons:
It’s relatively inexpensive and easy to find.
It’s very lightweight
It’s very forgiving to being pulled before it’s completely cured.
That last bullet is very important for curved pieces. The cast is pulled when it’s stable enough not to ruin the details but still soft. I then put it around a form (whatever I have to hand that’s the right size and shape (in this case, the base of a lamp and a mannequin arm) and use painter’s tape to hold it in place until it hardens completely. For the pauldron pieces, after taking them off the form, I used some masking tape to hold the curve and let them cure overnight just to be sure they didn’t flatten out at all.


The upper plates on the pauldrons were, in the end, created in foam. I decided to take this approach so that the pieces would remain flexible if anyone ran into them. I used a Dremel to make the details in the foam pieces and coated them with PlastiDip.
The foam pieces were glued to the upper pauldrons, and all the pieces were base coated with a dark metallic grey paint.


The backing “pads” for the pauldrons were made by covering 2mm EVA foam with brown gauze. Straps were created in faux leather to go around the biceps, and the straps to attach the pieces together were made out of 1” black webbing.
The pads were glued to the backs of the pauldron pieces, and Chicago screws were used to secure all the straps and corners of the pieces.


At this point, I used a red burlap ribbon to create the bows for the pauldrons and added the snaps to the straps. The pauldrons snap to the leather edge of the hauberk, and the hauberk, in turn, snaps to the gambeson at the upper corner. I also added a tie to the front of the hauberk to further secure it (this tie will be covered by the baldric).


The collar was created next. I used the same rust-colored faux suede from the gambeson, backed it with headliner foam, and edged it with twill. Before covering the other side with a long-pile faux fur, I added snaps to secure the collar to the hauberk.


The baldric was next. It was created from a medium-weight burgundy faux leather double layered, edged, and trimmed with the 2mm soutache cord. The buckle strap for the front was attached and detailed with bronze studs. To keep the baldric from twisting and also to prevent the buckle and strap from having to take all the weight of it and the scabbards, a heavy-weight snap was hidden beneath it.
The scroll details on the baldric were created by tracing the motif onto paper, and then laying netting on top. The ivory gimp braid was glued to the netting following the design on the paper underneath. The paper was carefully pulled away, the netting trimmed away, and the pieces were glued to the baldric.
Here are all of the pieces together for a test fit, and the unpainted brooch is attached with masking tape to check the proportion.


Next, I detail-painted all the cast pieces and attached the small hardware to the collar and tunic. The additional tunic details were done with 3/4” bronze studs.


The gauntlets were made from medium-weight brown faux leather padded with headliner foam. They were trimmed faux leather, 2mm soutache, and straps and buckles were added. Like the pauldron armor, the gauntlet plates were attached to the bases using Chicago screws.
I then turned to the accessories at the waist. These included the sash, made of khaki cotton with a woven print, two belts and the pouch. All these pieces were made using the same brown and burgundy faux leather as the other accessory pieces.


Next, I moved on to the boots. I took an existing pair of boots that would become the base shoes and pulled a masking tape form from them. Using that form, I created a paper pattern with the desired seamlines. This is the same technique I used to make the boots for the LARP Rogue costume.
I also used the paper pattern to create the shin and toe flaps that button over the fronts of the boots. The flaps were made first and trimmed with a 2mm soutache cord. The rest of the boots were built up, and the flaps and buttons were attached. Once the boots were tested for fit on the base shoes. the bottom edges were finished, and they were glued down.
Lastly, the holes were punched in the shin flaps so that the armor plates could be attached using Chicago screws.


The last pieces to create were the scabbards for the swords. The swords were foam LARP weapons purchased from Medieval Collectibles and Amazon, but neither came with a scabbard.
I traced the swords onto paper and used plastic wrap and tape to create the top, rounded parts of the scabbards. They were cut out of 2mm EVA foam, covered with faux leather, and stitched together. The edges were trimmed, sealed, and painted. The top and bottom details were made from EVA foam, painted silver, and detailed.
I made a base plate out of EVA foam and faux leather that the scabbards were tied onto. Then, the entire assembly was attached to the baldric with three Chicago screws. To ensure that the weight of the scabbards (and swords) didn’t pull the entire thing out of place, ties were threaded through the hauberk and tied to the scabbard base, hidden by the fur collar.
It is still quite heavy, and the hilts stuck up very high. So, the costume was only ever worn with one sword in the scabbard, and the other one was carried (also for posing).


And. at last, the complete costume.


