Starkiller
It's time for a new in-progress gallery. This one covers creating a Starkiller costume from Star Wars: Force Unleashed. For those unfamiliar with the game or the character, here are images from my reference file for the outfit.


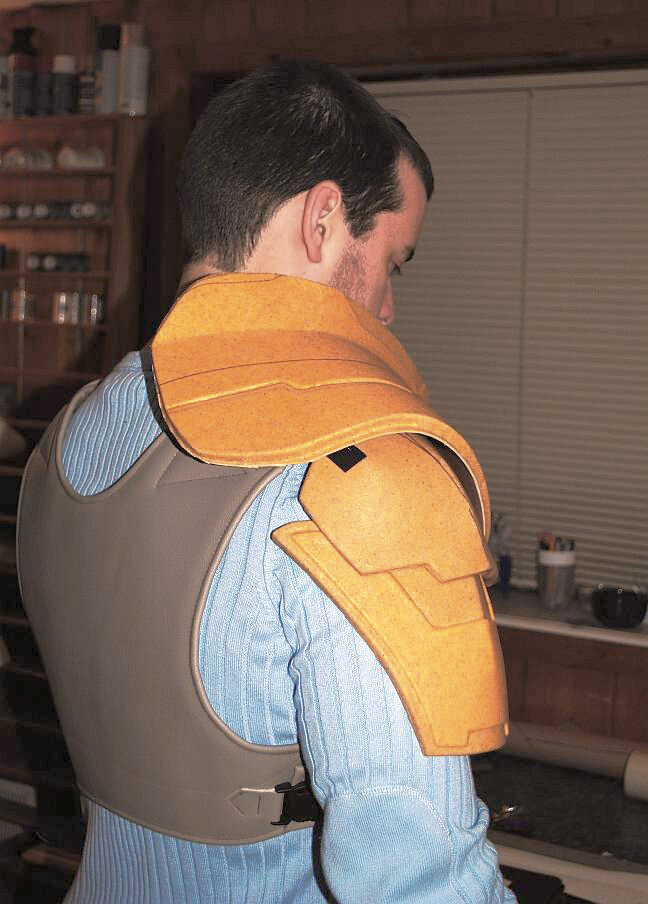
We began by working out a template for the armor. Starting with poster board, the general shape of the main shoulder armor was decided (to scale with the wearer), and then the collar piece was fitted to create the desired up-sweep.
Next, the pieces were assembled from 6mm EVA foam. After that, the same process was used to create the bell for the shoulder and the bicep piece.
We taped all the foam test pieces together and tried them on to see how they fit and moved.


After editing, we got the shapes and scale and began covering them with Worbla, a thermoplastic that comes in sheets. When heated, it becomes pliable and elastic and can be shaped over forms. Then, as it cools, it re-hardens to its original strength. For more about Worbla, click here.
I began with the bell. I started by adding the Worbla to the underside to support the shape while adding it to the outside. Working around the shape, I heated and reheated the Worbla until it was molded around the entire piece and sealed the edges.
After the entire foam piece was encased in plastic, I used scissors and an X-acto knife to trim the flange from around the shape. After trimming, I used my heat gun to reheat the edges and soften them slightly. Then, press the edges together to seal and smooth them and let them cool completely.
The bicep piece has some raised design elements - so to make those, I used a sheet of 2mm foam and cut the design from that. Then, that piece was tacked onto the main shape with hot glue, and the same process as above was repeated. The inside of the piece was covered first to lend support and hold the shape. Then, working from the bottom up, the front was covered. Using my fingernails and the pocket clip from the cap of a Sharpie, I could press the soft Worbla into the layers of foam and create the dimension I needed.
The recessed areas of the main collar were made the same way. To create the groove in the shoulder, I cut the collar piece out of 2mm foam, cut a 1/4" strip, and tacked it onto the main piece. Then, as I covered it with Worbla, I pressed the soft plastic into the groove. Same with the section at the top of the collar.


The client wearing the costume came by for a fitting, and we tried on the base vest. The vest will be outfitted with the rest of the strapping and accessories and then painted and distressed. The shirt will also get color-corrected, stained and distressed (and the sleeves shortened).


The next pieces I needed to make were the hand shields for the gloves. These were made using the same method as the rest of the armor pieces, except these were made of 2 layers of 2mm (rather than 1 layer of 6mm and 1 layer of 2mm) foam to keep the bulk down.


Next, it was time to prime the pieces. I wanted to prime them before sanding to see how much I took off the surface as I sanded. Since the material is fairly thin, I want to ensure I don't get carried away and sand holes in the pieces, which will be a pain to fill in.
Chris (wearing this costume) came over to help with the build because he wanted to learn more about how costumes are made. Be careful what you wish for! He was tasked with sanding, priming, and painting all the armor pieces and dyeing the shirt and wraps (to be shown soon).
He seemed to have a great time - he bonded with the detail sander, at any rate.


I linked the shoulder bell and the bicep pieces by embedding Chicago screws to the inside of the pieces. Then, I used leather strips to join them.
Most of the reference materials I've seen for the costume look like these are a single piece. However, we decided to do them in two pieces to increase the range of motion and add detail.
I then added additional straps to the top of the bell and used jean snaps to attach these pieces directly to the vest strap. I decided to attach these to the vest and not the shoulder piece so that the vest would take the weight and stress of movement of these parts and not the upper armor. As Chris posed in the costume, I wanted to prevent the upper armor piece from being pulled out of position.
I also built the vest from the actual material from which all the belting and pouches will be made. This was also given some paint and distressing treatments before finishing the costume. The shoulder and front detailing needed to be added to the vest, and the necessary sanding and paint had to be applied to the armor. Then, all the distressing and detail paint was applied once the hardware and belting were assembled.


Thanks to Chris Donio at Lab604 for the amazing resin hardware pieces he cast for this project. He did all the small, specialty hardware pieces (of which there are more than a few) based on the paper templates I gave him. The pieces were cast in resin and given a treatment of metal powder. The result was that the pieces took on a burnished, aged steel sheen when rubbed with steel wool.


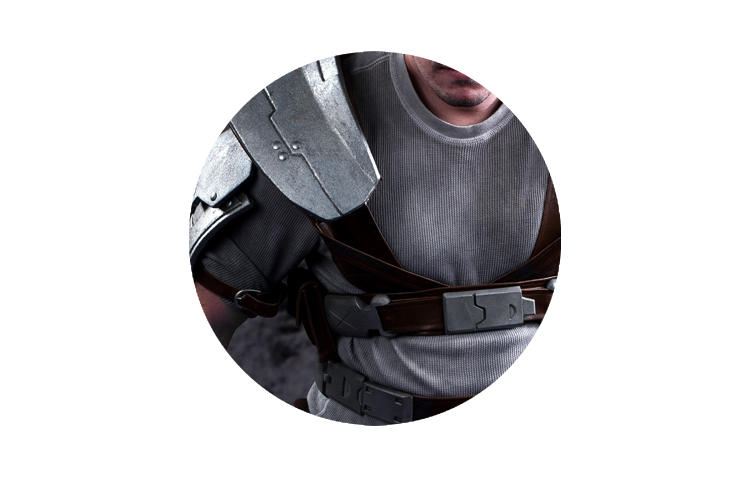
After laying out the resin casts on the in-progress belt pieces, the rest was just a giant jigsaw puzzle - figuring out what parts went together in what order to maximize style and function. While Chris was around, it was easy to try things on him, test the fit and scale and adjust things as we went.
After the fittings and the layout were settled, the middle belt hardware was the first to deal with. The resin pieces were striated on the back, and epoxy was the choice for setting them on the belt. However, there was concern that the semi-smooth surface of the belt would not grip the epoxy. So, muslin strips were sewn into the surface to give the epoxy something to hold onto.
The resin pieces were glued into the muslin with epoxy and set aside to cure - we'll come back with pics of that in a bit. The central belt was tackled next. The buckle and side discs were secured with Chicago screws that were embedded into the resin during casting (once again - thank you, Chris Donio!). A few additional screws were added to the buckle to hold the lower straps.
Once the main belt pieces were together, the details for the leg strapping were fitted, cut and assembled. For several of the pieces of the lower belt and leg straps, Chicago screws were used to secure the resin pieces to the belts since they would take the most abuse from movement and stress. If you're unfamiliar, Chicago screws are insanely valuable for costume projects and available at most hardware stores or online. I've linked them in this thread for easy searching.
For pieces that did not already have the threaded posts embedded in the resin, I glued the posts to the back of the pieces with Loctite and then cut a Worbla disc to encase the base of the post and seal it to the piece. Then, holes are punched in the belt pieces, and the resin pieces are screwed in place. Here's a picture of the belt and the leg straps.


The whole costume is coming together and there are only a few details left to attend to.

Here's how it looks at this point. The last piece to assemble was the pad to go under the shoulder armor. This piece needed to fit very snugly and smoothly, so I created it from the same template used for the original piece. The pieces were cut out of EVA foam and glued together. Then, they were trimmed to be slightly smaller than the armor.
Once the foam base was complete, the lower surface was covered in thin foam to add padding.
Finally, the cover and straps were made from the same material as the vest and belts, and the pad was essentially upholstered. Then, the pad was glued to the bottom of the armor, and corresponding snaps were added to the vest. The last details were ripping linen and distressing it for the strapping and some final color correction.


Here's a video of the whole build and the final costume:


